Universal Joint Cross Kit for PTO Shaft | EP-GCr15 OEM Steel

Universal joint cross kit designed for PTO shafts and industrial drive systems, manufactured from high-strength GCr15 bearing steel for superior wear resistance and fatigue performance under continuous load. This OEM-grade cross kit features precision-ground trunnions, pre-filled grease needle bearings, and a complete assembled structure for quick installation and long service life. Widely used in agricultural machinery, construction equipment, and industrial drivelines, it ensures stable torque transmission even at varying angles. Custom sizes, OEM packaging, and bulk supply are available for B2B distributors and equipment manufacturers worldwide.

Beskrivning

PTO Shaft Accessories — Cross Kit

OEM Steel Drive Shaft
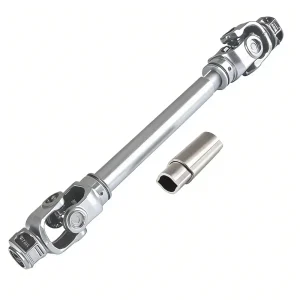
Universal Joint Cross Kit —EP-GCr15

4.9 / 5 — 130+ verified orders

GCr15 Bearing Steel
Oil-Greased Needles
Custom Size Available
OEM Support

OEM-grade universal joint cross kit manufactured from GCr15 high-carbon chromium bearing steel — the same alloy standard used in precision roller bearings. Pre-packed with oil grease, available in standard and custom dimensions, and supplied in a single-piece assembled unit ready for direct installation into agricultural PTO shafts and industrial drivelines.

Material
GCr15 Bearing Steel
Lubrication
Oil Grease Pre-filled
Structure
Single Unit Assembly
Size
Custom / Standard
Finish
Silver (metallic)
OEM Support
✔ Available

CE & ISO 9001
Ships Worldwide
B2B Wholesale
24h Quote

EP GCr15

What Is This Universal Joint Cross Kit?

The universal joint cross kit (also referred to as a U-joint, spider kit, or cross journal) is the central articulating component in a PTO shaft or vehicle driveshaft. It consists of a four-armed cross journal, four needle roller bearing cups, and retaining clips — all assembled as a single unit that allows the driveline to transmit torque through varying angles without vibration or power loss.

This OEM-specification cross kit is manufactured from GCr15 high-carbon chromium bearing steel — the ISO standard designation for 52100 bearing steel — heat-treated to 58–64 HRC at the trunnion bearing journals. GCr15 is selected specifically because it achieves the combination of surface hardness, core toughness, and fatigue strength required under continuous oscillation loading at PTO shaft operating speeds. Each cross kit is pre-packed with oil grease to ensure the needle roller bearings are protected from the moment of installation.

6 Engineering Advantages of This Cross Kit

01
GCr15 Bearing Steel — Heat-Treated to 58–64 HRC

GCr15 (ISO 52100) is the standard material for precision rolling element bearings globally. The trunnion journals on this cross kit are heat-treated to 58–64 HRC surface hardness — hard enough to prevent brinelling under impact loads, while the core remains at lower hardness to absorb shock without brittle fracture. Standard mild-steel cross kits cannot achieve this hardness-toughness balance.

02
Pre-Filled Oil Grease — Ready to Install

Needle roller bearings are packed with oil grease before assembly. This means the cross kit is fully lubricated at point-of-installation — no separate greasing step required before first use. Dry installation of a cross kit is one of the most common causes of early bearing failure in field settings where grease guns are not immediately available.

03
Single-Unit Assembled Structure

Cross journal, needle roller bearing cups, and snap rings are supplied as a complete pre-assembled unit. This eliminates the risk of mismatched components from multiple sources and ensures that bearing cup alignment is correct before the kit reaches the installation bench — misaligned cups are a leading cause of abnormal wear in field-assembled cross kits.

04
Custom Size Manufacturing

Standard cross kit dimensions cover the most common PTO shaft and industrial driveline applications. For non-standard trunnion diameters, cup ODs, or overall cross widths — common in European implement brands and specialized industrial machinery — we manufacture to drawing or sample. Minimum quantities vary by complexity; contact us for details.

05
OEM Customisation Support

Available with OEM packaging, part number labelling, and custom grease specifications for PTO shaft manufacturers and industrial equipment OEMs. Consistent batch-to-batch dimensional tolerances — trunnion journal diameter tolerance ±0.005 mm — support assembly-line installation without incoming inspection rework.

06
Wide Industry Compatibility

Designed to fit G Series, S Series, and L Series PTO shaft assemblies as well as light vehicle and industrial driveshaft applications. Used across agricultural machinery, construction equipment, food processing drives, manufacturing plant machinery, and hydraulic pump drivelines — wherever angular torque transmission is required.

How to Replace a Universal Joint on a PTO Shaft

Follow this sequence exactly. Skipping steps — particularly the inspection step before fitting the new kit — is the most common cause of repeat cross kit failure within one season.

Before starting: shut off the tractor engine, disengage the PTO, wait for all components to come to a complete stop, and remove the ignition key. Never work under a suspended implement or with the engine running.

STEP 1
Secure & Access the Joint
Clamp the PTO shaft firmly in a bench vise with protective jaw pads. Locate the universal joint that requires replacement — identify it visually (look for pitting, roughness, corrosion, or visible play when rotating the joint by hand). Mark the yoke orientation with a paint pen before disassembly to ensure correct phase alignment during reassembly.
STEP 2
Remove Retaining Clips
Use internal snap ring pliers to remove the retaining circlips (C-clips) from all four bearing cup grooves in the yoke ears. Work one clip at a time. Set them aside in a clean container — they are reusable if undamaged. Never use a screwdriver to pry snap rings; a launched circlip travels at high velocity and can cause serious eye injury.
STEP 3
Press Out the Bearing Cups
Use a bench press or a large socket and hammer to drive each bearing cup out of its yoke bore. Support the yoke ear on a socket slightly larger than the cup OD. Press the opposite trunnion — this pushes the cup out of the bore and into the receiving socket. Work diagonally across the cross kit (not adjacently) to keep the cross journal centred during removal.
STEP 4
Separate Yokes & Remove Old Cross
With all four bearing cups removed, the two yoke halves will separate and the old cross journal can be lifted out. Inspect both yoke ears for any cracks, elongation of the bore, or deformation — a deformed yoke bore will destroy a new cross kit within hours of reinstallation. Replace the yoke if bore ovality exceeds 0.05 mm.
STEP 5
Clean, Inspect & Prepare Bores
Clean all four yoke bores with solvent and a wire brush to remove old grease, rust scale, and debris. Any debris left in the bore will prevent the new bearing cup from seating fully, creating angular play that collapses the needles within a few hours of operation. Wipe dry and apply a thin coat of fresh grease to the bore walls before fitting the new kit.
STEP 6
Install New Cross Kit
Partially press one bearing cup into its bore, insert the cross journal trunnion into the cup, then press the opposite cup in from the other side. Work diagonally. Press each cup in only until the snap ring groove is exposed — do not over-press, which preloads the needles and causes rapid fatigue failure. Fit all four retaining clips and confirm each snaps fully into its groove before moving on.
STEP 7
Reassemble & Run-In Test
Reinstall the PTO shaft assembly, observing your orientation marks from Step 1 to ensure yoke phasing is correct (yokes must be in phase — both yoke forks in the same plane). Reattach the safety shield and retaining chains. Start the tractor, engage the PTO at low RPM (200–300 RPM), and run for 2–3 minutes while listening for any clicking, roughness, or vibration. If any abnormal noise is present, disengage immediately and recheck bearing cup seating and snap ring installation. A correctly installed cross kit will run silently from first engagement.

Applications — Where This Cross Kit Is Used

🚜
Agricultural PTO Shafts
G, S & L series drivelines on tractors, balers, mowers & tillers
🏗
Construction Equipment
Excavator, crane, and ground-drive driveshaft assemblies
🏭
Manufacturing Plants
Conveyor, press, and rotary machinery driveline U-joint replacement
🍞
Food & Beverage
Mixer, bottling line, and processing equipment drive shafts
🔧
Machinery Repair Shops
High-volume replacement SKU for workshop stock across all driveline types
⚙️
OEM Assembly Lines
Factory-installed in new PTO shafts, driveshafts, and cardan shaft assemblies

Frequently Asked Questions

What does GCr15 mean and why does it matter for a cross kit?
+
GCr15 is China’s GB standard designation for high-carbon chromium bearing steel, equivalent to ISO 52100 (also called 100Cr6 in Germany or SUJ2 in Japan). It achieves 58–64 HRC surface hardness after heat treatment, making it the standard material for precision rolling elements. Standard mild steel cross kits cannot reach this hardness — they pit and brinell rapidly under oscillation loading.
How do I know if my cross kit needs replacing?
+
Four signs: (1) clicking or knocking sound at PTO engagement, (2) visible rust, pitting, or surface spalling on the trunnion journals, (3) angular play when rotating the joint by hand with the shaft stationary, (4) vibration that was not present previously. Any one of these indicates the cross kit has exceeded its service life. Operating a worn cross kit transfers shock to the yoke bores and accelerates yoke failure, which is far more expensive to replace.
How often should I regrease the cross kit after installation?
+
Every 8 operating hours using NLGI #2 lithium-complex EP grease. Apply through the grease nipple on each trunnion cap until fresh grease purges from the bearing seal — confirming the needle cavity is fully charged. In dusty or chemical-spray environments, reduce this interval to 6 hours. Never pack with heavy grease that cannot reach the needle rollers; flow-grade EP2 is the correct specification.
Can I order a non-standard cross kit size for a European implement brand?
+
Yes. Send us the trunnion diameter, cup OD, and overall cross width (measured trunnion end-to-end on both axes). We will confirm from stock or quote custom production. European cross kits (Walterscheid, BLW, Bondioli & Pavesi profiles) often differ from North American standards — do not assume interchangeability. Provide measurements or the original OEM part number for the fastest turnaround.
What is the minimum order quantity and lead time?
+
MOQ is 1 unit for standard sizes. B2B volume pricing applies from 50 units with further tiers at 200+ and 500+. Standard sizes ship within 7–15 business days. Custom sizes require 20–35 days depending on complexity. OEM packaging and private-label options are available at MOQ 100 units. Contact us with quantity and delivery location for a tiered price schedule within 24 hours.

What Customers Say

HK

“We supply agricultural machinery repair parts across three provinces. GCr15 cross kits are a consistent demand line — we’ve been sourcing from this supplier for two seasons. Trunnion diameter tolerance has been within ±0.004 mm on every batch we’ve measured, which is tighter than most competitors claim on paper. Zero warranty returns in 14 months across approximately 600 units.”

H. Krueger
Parts Distribution Manager — Saskatoon, SK, Canada

Verified B2B · ~600 units

RC

“We replaced the cross kits on our industrial mixing line driveshafts — 8 units running 3-shift cycles in a humid flour-processing environment. Previous kits from a local supplier were failing at 900–1,100 hours. These GCr15 units have now reached 1,600 hours with no signs of pitting or play on any of the eight joints. The pre-greased delivery also eliminated our incoming prep step, which matters when you’re processing 400 units of machinery maintenance per quarter.”

R. Colangelo
Maintenance Engineer — Food Processing Plant, Bologna, IT

Verified · 8 units · 1,600+ hrs

JP

“I’ve replaced a lot of U-joints in my time. Usually involves a hammer, some creative language, and at least one trip to the store for a tool I didn’t know I needed. These came pre-greased, dropped right in on the first try, and didn’t require me to invent any new words. My shop helper asked if I’d been secretly practicing. I said no — the parts were just actually correct. Ordered 20 more immediately. My vocabulary has improved significantly.”

J. Pellegrini
Equipment Mechanic — Lubbock, Texas, USA

Verified · 20+ units

SW

“We build PTO shaft assemblies for the European market — our customers specify cross kits to ISO 52100 equivalent, which is exactly what GCr15 delivers. We’ve been using this supplier’s cross kits on our assembly line for 11 months. Batch acceptance rate on incoming dimensional check is 99.6%, which is better than two of our previous three European-sourced suppliers. The custom-size programme also covered a non-standard 35×105 cross kit we needed for a Danish customer within 28 days, without a premium tooling surcharge.”

S. Wierzbicki
Production Director — PTO Shaft Manufacturer, Poznań, PL

OEM Verified · ongoing supply

Get Started

Order GCr15 Cross Kits.
Quote in 24 Hours.

Send us your cross kit dimensions or OEM part number, required quantity, and delivery location. Standard stock or custom production — we’ll confirm availability and pricing within one business day.

Contact Details
Address
27 Harley Crescent, Condell Park NSW 2200, Australia
ISO 9001
CE Certified
OEM Supply
Custom Sizes

universal joint cross kit · GCr15 drive shaft cross kit · OEM steel U-joint cross kit · PTO shaft universal joint replacement · driveshaft cross journal · how to replace universal joint on PTO shaft · cross kit supplier B2B · GCr15 bearing steel cross kit · agricultural PTO driveline spare parts · driveshaftjoint.com cross kit

Ytterligare information

editor

WM